|
|
 |
|
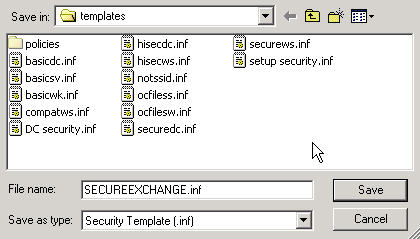
Back to Article List It's Easy to Secure Windows 2000 Servers: Part 6 By Laura Taylor August 17, 2005 In the earlier installments of this series, you learned how to use Microsoft's Management Console (MMC) to automatically configure and enforce security policies by creating security templates and installing them on multiple servers. In Part 6, we're going to cover how to secure a Windows 2000 Exchange server. (The settings described in this article were tested and verified with Exchange Server 5.5.) Getting Started on Microsoft Exchange Server Security Microsoft Exchange Server is a messaging application designed for the secure transmission of enterprise e-mail. While all of the configuration options are built-in to ensure that your e-mail services stay secure, they are not already configured by default. By applying appropriate security configurations, however, you can lock down your Exchange server as tight as you would want any messaging server to be. Before I teach you how to apply the right security settings, there is some background information on Microsoft Exchange that you should be aware of. As a general best practice, it is very important that Microsoft Exchange Services are not installed on a domain controller. It simplifies administration for Microsoft Exchange to have its own system and also ensures a proper separation of duties between administrators. After all, the person who administers Exchange server may not be the same person as the one who administers the domain controller. Many organizations have a mandatory separation of duties for the administration of these two types of mission-critical servers. Since it's common practice for hackers to look for the Administrator account on servers, I recommend managing Exchange Server with an account that has the same privileges as the Administrator account but uses a different name. It is best that this account be created on the domain controller prior to the installation of Microsoft Exchange, since you will want to install Microsoft Exchange using this account since the domain controllers usually stores the list of master accounts. In lieu of using the Administrator account, create a different account on the domain controller that will be used to start and administer all of the Exchange services. Select an account name that sounds rather innocuous and unmemorable. Make sure that the username is not easy to identify as an Exchange service account, and be sure not to enter a description for the account as that would defeat the whole purpose of obscuring it. Be sure to assign a strong password to this account using at least eight characters, mixed case letters, and some numbers. You'll also need to create an Exchange Administrators group. (Do not use any of the Windows Administrators groups.) Add the new account to the Exchange Administrators group. It is best if this account is not used to start any other services other than Exchange services. Configure all Exchange Services to start up using the new account. Install the latest Exchange Service Pack and any applicable Hot Fixes and disable all unnecessary connectors and protocols. Now you are ready to apply the Exchange server security configurations. Applying Exchange Server Security Configuration Settings As with all security templates, you're going to want to start by using the Microsoft Management Console (MMC) to launch the creation of a security template. Load the Security Template snap-in Console as you learned in Part 1. Once you have the snap-in loaded, select the secure basic server (basicsv.inf) template that you have already configured. You are then going to save it into a new file called SECUREEXCHANGE.inf as shown below. By using your original basic server template and then modifying it, you will have all the original Windows 2000 security settings that you already configured for to start with.
Loading the SECUREEXCHANGE security template. Once you have saved your SECUREEXCHANGE.inf file, you can expand it to see the subcategories as shown below.
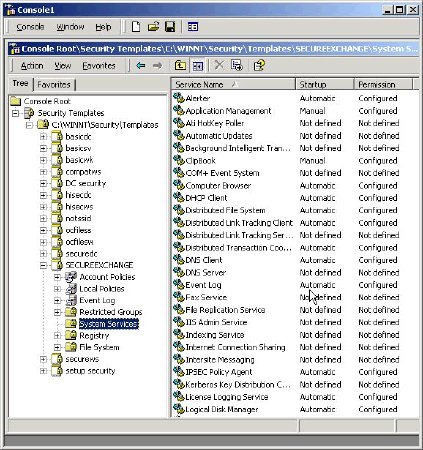
Expanding the subcategories in your SECUREEXCHANGE template. The two sub-categories that you will need to configure to secure Exchange are System Services and Filesystem. Select the Services configuration category as shown below.
Configuring system services. The Services should be secured for both the Administrators group and for the SYSTEM. Follow the methodology from Part 3 to access System Service configuration settings for Administrators and SYSTEM. Apply the security settings to both the Administrators and SYSTEM groups. The System security settings that you will want to configure are listed in the following table:
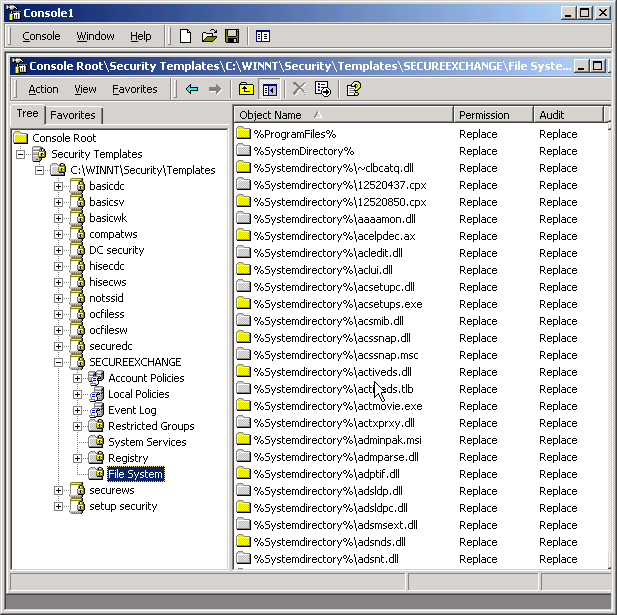
Next you need to secure the Filesystem that contains the Exchange Server files. To do this, select the Filesystem category as shown below.
Apply the Filesystem security settings listed in the following table to both the Administrators and SYSTEM groups:
By applying Filesystem security settings to your Exchange server, you will protect the Exchange server system directories where critical files, such as service logs, are located. Your Exchange server security settings are now configured. You should now reboot the server, and when it comes back up check to make sure that all the Exchange-related services are active and running. Testing Your Exchange Server Security Settings Before putting your Exchange server into production, I recommend that you conduct tests to ensure that the recommended security settings do not impact the daily work of your users. The testing performed should include the unique set of applications that are currently being used by your organization. Implementing a pilot test environment on your intranet to simulate an actual production network will help you determine if there are unforeseen issues that may require further work. It is important to have your tests performed by real world end-users to more practically test the different permissions required by different end-user roles. Some basic tests you can perform including adding mailboxes and distribution lists and then seeing if they work. You'll need a client system configured to use the Exchange server for sending and receiving e-mail messages; add a few test user accounts for the purpose of sending and receiving the test e-mails. A sequence of tests you can perform on the Exchange server is listed below:
Adding a mailbox (assuming a domain user account exists): Now send an e-mail to the text account; login and see if it was received. Ensure that the mailbox can also send outgoing mail. Adding a distribution list:
Now see if the members of the distribution list can receive e-mail distributions. Login to the members' mailboxes to ensure that the distributions were properly received. Deleting a mailbox: To ensure that the mailbox was properly deleted, try sending e-mail to it and see what happens. The e-mail should bounce back. Deleting a distribution list: To ensure that the distribution list was properly deleted, try sending e-mail to it and see if bounces. Exchange Server Security Wrap-up Securing Exchange is not as hard as it would seem. Though you can lockdown Exchange every single time your server reboots, if you setup an Exchange security template you won't have to. A security template reconfigures the server with the template settings each time the server reboots.
Other types of servers you can create security templates for include SharePoint servers, IIS servers, SQL servers, and DHCP servers. There really is no limited to the number of security templates you can create. Windows 2000 servers can be locked down as tight as any other type of server if you take the time to learn how to do it.
|
| Copyright 1997-2025 Relevant Technologies. All rights reserved | Legal and Privacy | Sitemap Email: info@relevanttechnologies.com | 8115 Maple Lawn Blvd, Suite 350, Fulton, MD 20759 |